A recent addition to the 'split by delimiter' options allows a column to be split to rows as opposed to columns. This has a number of benefits but it can also be used to insert blank rows into a dataset.
Update - to do this with multiple columns there are some additional steps, I've covered these at the bottom of this post.
For example, if we had a list of colours and we wanted to add 2 blank rows between each change of colour

Can be transformed to become…

This is how its done.
First, load the data to Power Query. For this example I've used the 'enter data' function to directly paste it into the data model. You can use the 'get and transform function in Excel to load a CSV or Excel file as required.
Then, add an index from 0 and change the column name to 'Primary'

Next we'll add another index from 1 and change the column name to 'Secondary'

Once these are added, we'll use the 'Merge' function to merge the table with itself using the 2 index columns as the matching columns. This process is similar to a Vlookup in Excel and will return the subsequent row in the table. Once this is set, click ok.
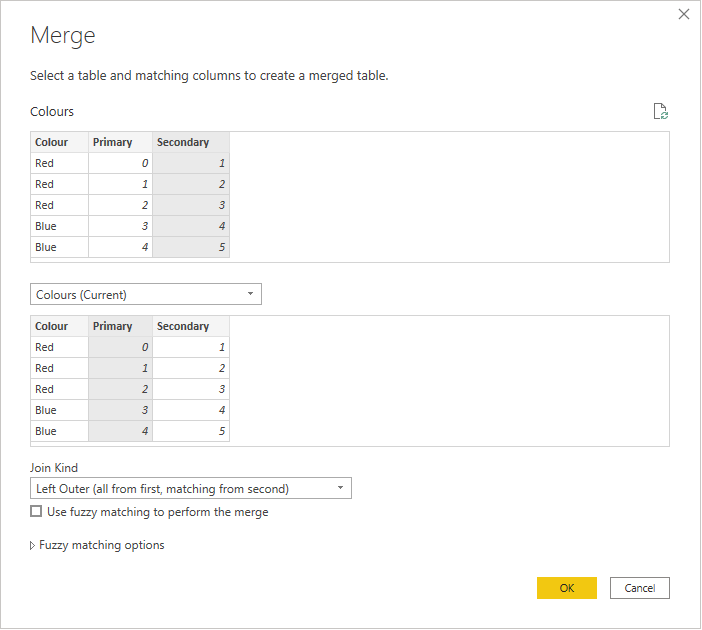
The result of this step will be an additional column with each row containing a table of data that is associated with the next row.

To obtain the subsequent colour, click on the expand button and untick everything apart from 'Colour'

This will return the following values

Note - in this example, I've amended the default column name in the formula so that the new column is titled 'NextColour' as you can see in the formula bar.
Now we'll add a custom column with the following If statement. The first line of the formula is to deal with the last row that doesn’t have a 'NextColour'. The second line of the formula will determine if the colour is the same as the next colour. If it is a match then the result will be the Colour otherwise (else) it'll be Colour with two commas suffixed to the end of the value. Once this is done, click 'ok'

This is the result of the custom column. You can see where there is a change of colours in the Colours column, we now have 2 commas at the end of the value. We'll turn these into rows in the next few steps.

Next, select the Custom column, right click on the header row and select 'remove other columns'

This will leave just the modified column which we can then transform

Then, select the column, click on the 'Transform' ribbon, click on 'Split Column' then 'By Delimiter'

Ensure the selected delimiter is a comma, with 'Each occurrence of the delimiter' ticked then click on 'Advanced options' and select 'Rows' (as opposed to Columns) and click OK.

This will create a table where the commas have been transformed into new, blank rows

Finally, change the column name to Colours and the transformation is complete. Click 'Close and Load / Close & Apply to load the transformed data into your data model (Spreadsheet or data model in PowerBI).
Here is the query I used to create this transformation. Note the source I used was the values entered using the 'Enter Data' function, your application will differ so the second line of code will be the place to start.

let
Source = Table.FromRows(Json.Document(Binary.Decompress(Binary.FromText("i45WCkpNUYrVwaSdckpTURmRqTk5+eXEMd2LUlPzcLKcchKTs5ViYwE=", BinaryEncoding.Base64), Compression.Deflate)), let _t = ((type nullable text) meta [Serialized.Text = true]) in type table [Colour = _t]),
#"Added Index" = Table.AddIndexColumn(Source, "Primary", 0, 1, Int64.Type),
#"Added Index1" = Table.AddIndexColumn(#"Added Index", "Secondary", 1, 1, Int64.Type),
#"Merged Queries" = Table.NestedJoin(#"Added Index1", {"Secondary"}, #"Added Index1", {"Primary"}, "Added Index1", JoinKind.LeftOuter),
#"Expanded Added Index1" = Table.ExpandTableColumn(#"Merged Queries", "Added Index1", {"Colour"}, {"NextColour"}),
#"Added Custom" = Table.AddColumn(#"Expanded Added Index1", "Custom", each if [NextColour] = null then [Colour] else
if [Colour] = [NextColour] then [Colour] else [Colour]&",,"),
#"Removed Other Columns" = Table.SelectColumns(#"Added Custom",{"Custom"}),
#"Split Column by Delimiter" = Table.ExpandListColumn(Table.TransformColumns(#"Removed Other Columns", {{"Custom", Splitter.SplitTextByDelimiter(",", QuoteStyle.Csv), let itemType = (type nullable text) meta [Serialized.Text = true] in type {itemType}}}), "Custom"),
#"Renamed Columns" = Table.RenameColumns(#"Split Column by Delimiter",{{"Custom", "Colour"}})
in
#"Renamed Columns"
Working with Multiple Columns
If the previous process is applied to a table with multiple columns (that need to remain) the result isnt blank rows but rows where the upper value is repeated. If you need to get blank rows you'll need to do the following.
The process is the same up to the point where the additional custom column is added then it is slightly different.
Once the custom column is added, split the column as before with these settings

if [Custom] = "" then "" else [SKU]


This is the query associated with the multiple column process

let
Source = Table.FromRows(Json.Document(Binary.Decompress(Binary.FromText("i45WUtIBo1idaCVDIACyg1JTQCRMyAhTyBhTyATIccopTQVRMDFTLGJmQE5kak5OfjmIARM1xypqgVXUEpuokQGQ416UmpoHomGChtgEjbAJGoOdmpicDXFrLAA=", BinaryEncoding.Base64), Compression.Deflate)), let _t = ((type nullable text) meta [Serialized.Text = true]) in type table [SKU = _t, Colour = _t, ID = _t]),
#"Added Index" = Table.AddIndexColumn(Source, "Primary", 0, 1, Int64.Type),
#"Added Index1" = Table.AddIndexColumn(#"Added Index", "Secondary", 1, 1, Int64.Type),
#"Merged Queries" = Table.NestedJoin(#"Added Index1", {"Secondary"}, #"Added Index1", {"Primary"}, "Added Index1", JoinKind.LeftOuter),
#"Expanded Added Index1" = Table.ExpandTableColumn(#"Merged Queries", "Added Index1", {"Colour"}, {"NextColour"}),
#"Added Custom" = Table.AddColumn(#"Expanded Added Index1", "Custom", each if [NextColour] = null then [Colour] else
if [Colour] = "" then "" else
if [Colour] = [NextColour] then [Colour] else [Colour]&",,"),
#"Split Column by Delimiter" = Table.ExpandListColumn(Table.TransformColumns(#"Added Custom", {{"Custom", Splitter.SplitTextByDelimiter(",", QuoteStyle.Csv), let itemType = (type nullable text) meta [Serialized.Text = true] in type {itemType}}}), "Custom"),
#"Removed Columns" = Table.RemoveColumns(#"Split Column by Delimiter",{"Secondary", "NextColour"}),
#"Added Custom1" = Table.AddColumn(#"Removed Columns", "Custom.1", each if [Custom] = "" then "" else [SKU]),
#"Added Custom2" = Table.AddColumn(#"Added Custom1", "Custom.2", each if [Custom] = "" then "" else [ID]),
#"Removed Other Columns" = Table.SelectColumns(#"Added Custom2",{"Custom", "Custom.1", "Custom.2"}),
#"Renamed Columns" = Table.RenameColumns(#"Removed Other Columns",{{"Custom", "Colour"}, {"Custom.1", "Sku"}, {"Custom.2", "ID"}})
in
#"Renamed Columns"
Comments
Post a Comment